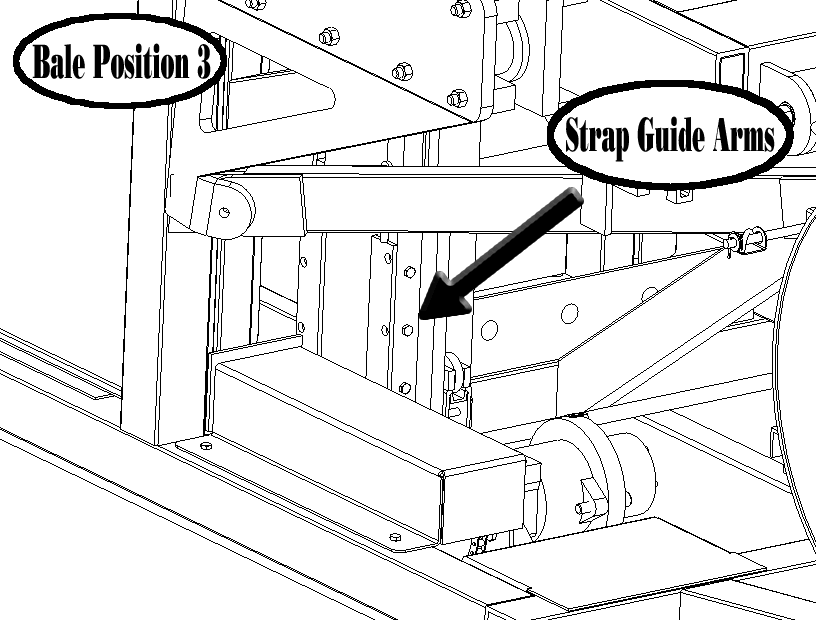
015 – Waiting for Strap Guide Arms at Bale Position 3.
Note: The machine has turned on the Strap Guide Arms motor and sent them down. When the Strap Guide Arms magnet reaches the Bale Position 3 sensor bar switch, the machine stops the motor. The machine is waiting for the magnet to reach the Bale Position 3 sensor bar switch. The switch is located near the bottom of the sensor bar at the yellow mark.
Check position of Strap Guide Arms.
If Strap Guide Arms are on the floor,
– Check how the return line is hooked to the tractor and make sure there is NO BACK PRESSURE. If there is any back pressure at all the Bale Band-It will not operate properly and will continue to release the Strap Guide Arms motor’s brake causing improper location of Strap Guide Arms. Back pressure is the #1 problem with the Strap Guide Arms not being in the proper position. The return line CANNOT be connected directly to the remote or ran through a return kit. It must be connected directly to the tank of the tractor or through the fill cap WITHOUT restriction.
– Check for excess hay or chaff under the Strap Guide Arms preventing them from going down. Chaff will periodically build up here according to the different conditions of the hay. The dryer the hay, the more chaff builds up. It is a good operating practice to periodically clean the area under the Strap Guide Arms to prevent this. When this happens disengage hydraulic power and place a magnet (South Pole only) in front of the Bale Position 3 sensor bar switch for 2 seconds. This switch within the sensor bar is located near the bottom of the sensor bar and will be marked with a yellow colored pen. Due to the Strap Guide Arms being in the bottom position, this switch is not easily accessed. To provide an easier way, the Bale Position 1 and Bale Position 3 switches are wiring together. Therefore, placing the south pole of the magnet at Bale Position 1 (green mark) will trip the switch at Bale Position 3. Engage hydraulic power, the machine should continue to operate, raising the Strap Guide Arms to the top of the machine. This will allow for easy removal of the chaff and excess hay from under the Strap Guide Arms.
– Check that Strap Guide Arms are in time with each other. They should be the same height. If their heights vary ½ inch (12.5 mm) or greater then they are at least one gear tooth out of time. A quick way to check their heights is to compare the distance between the Vertical Plunger plates to the Strap Guide plates. In order to prevent the Strap Guide arms from getting out of time, keep their chains tight.
If the Strap Guide Arms are not on the floor,
– Check that the tension applied by the Strap Crimper Roller is not too great. If the strapping is too thick or foreign material is located in the Strap Crimper Roller it will cause excessive strap tension. If the tension is too great it will stall the Strap Guide Motor.
– Check that the strapping is not caught or kinked preventing it from flowing easily.
– Check that hydraulic power is still on to the machine and that return line is still connected.
– Check that a bale or foreign object is not preventing the Strap Guide Motor from moving.
– Check that the directional valve is not stuck.

Leave a Reply
Want to join the discussion?Feel free to contribute!