– Disengage hydraulic power and unplug main power cord. Wait for approximately 10 seconds, plug back in and engage hydraulic power. If this doesn’t change the “098” code, then take out all bales in front chamber by opening the side doors. Once the bales are out, press the Reset Bundle button.
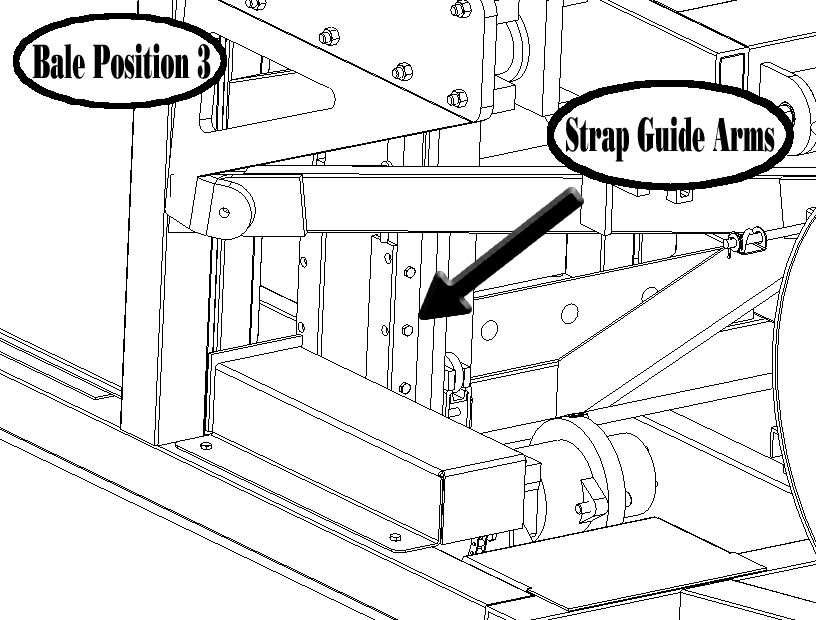
Note: Before the machine will lower the Strap Guide Arms, it does a safety check on the Bale Position 3 sensor bar switch. It checks to see if the sensor bar switch is stuck on. If it is, it will wait until the sensor bar switch is off before continuing the operation. The switch is located at the bottom of the sensor bar at the yellow mark.
– Tap on Bale Position 3 sensor bar switch until display number changes or replace the sensor bar.
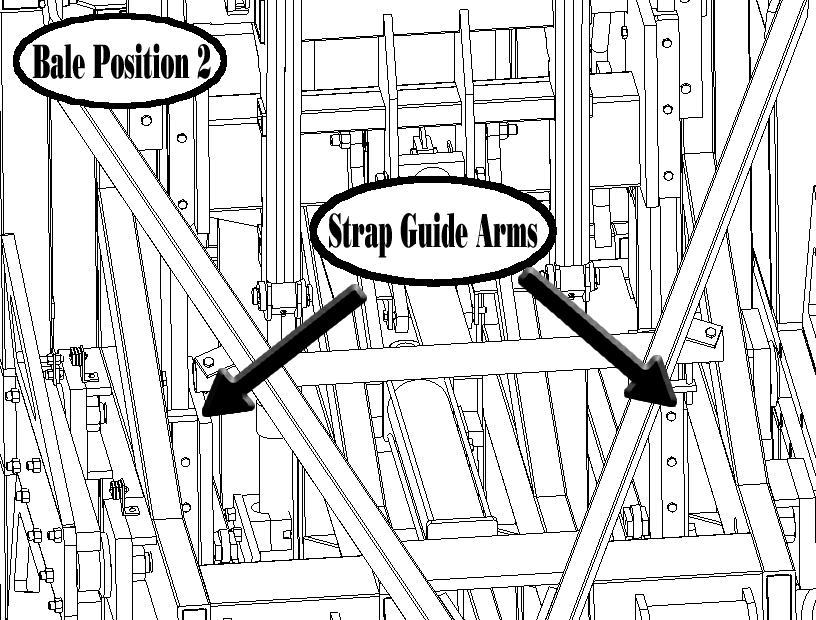
Note: Before the machine will lower the Strap Guide Arms, it does a safety check on the Bale Position 2 sensor bar switch. It checks to see if the sensor bar switch is stuck on. If it is, it will wait until the sensor bar switch is off before continuing the operation. The switch is located lower mid way of the sensor bar at the blue mark.
– Tap on Bale Position 2 sensor bar switch until display number changes or replace the sensor bar.
Note: Before the machine will lower the Strap Guide Arms, it does a safety check on the Bale Position 1 sensor bar switch. It checks to see if the sensor bar switch is stuck on. If it is, it will wait until the sensor bar switch is off before continuing the operation. The switch is located mid way of the sensor bar at the green mark.
– Tap on Bale Position 1 sensor bar switch until display number changes or replace the sensor bar.
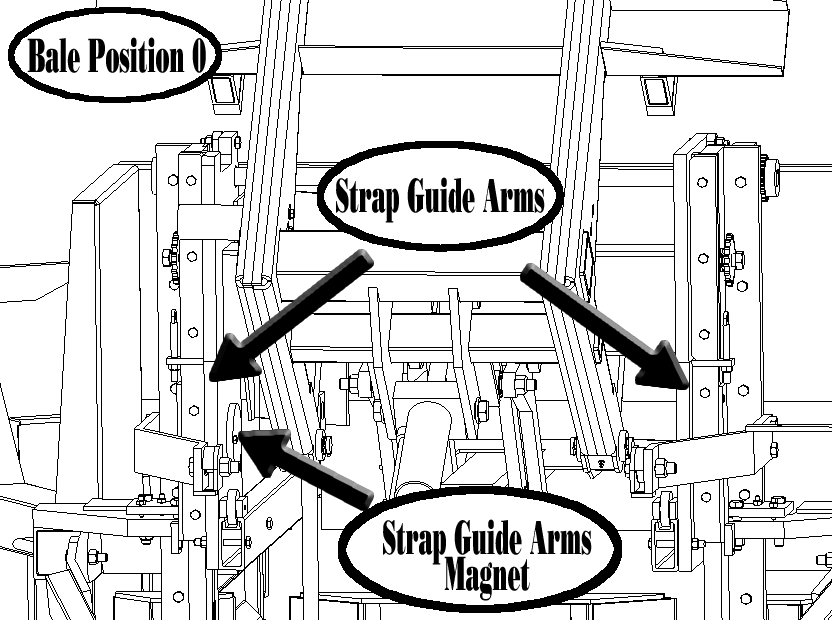
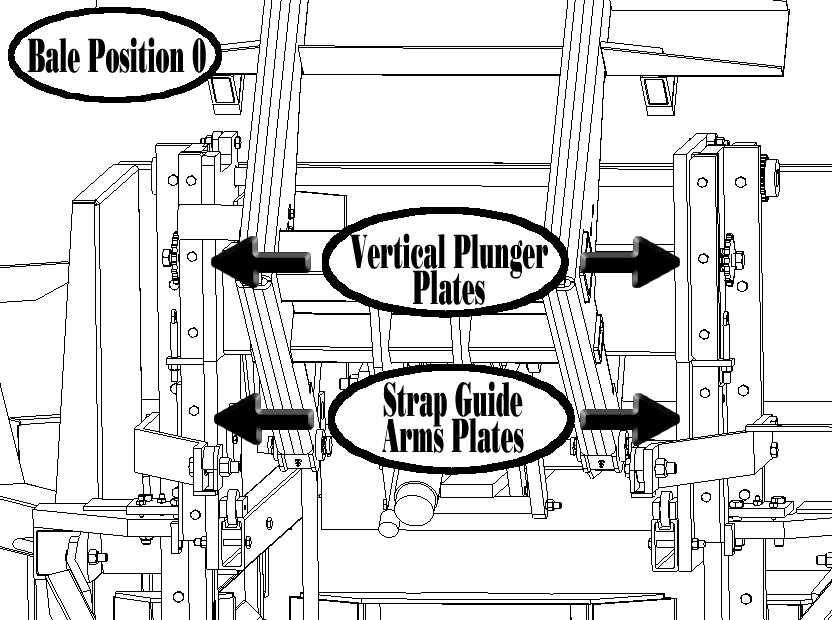
Note: Before the machine will raise the Strap Guide Arms, it does a safety check on the Bale Position 0 sensor bar switch. It checks to see if the sensor bar switch is stuck on. If it is, it will wait until the sensor bar switch is off before continuing the operation. The switch is located upper mid way of the sensor bar at the brown mark.
– Tap on Bale Position 0 sensor bar switch until display number changes or replace the sensor bar.
If the iPad or monitor says there has been a communication delay:
- Disengage the hydraulic power and unplug the power cord. Wait approximately 10 seconds and then plug it back in and reengage the hydraulic power
- If that does not change the operation code, then turn the hydraulic power off and check the voltage going to the two electrical boards. Make sure they are receiving at least 12 volts.
- Check the R1 and T1 wire connections on the front and band electrical boards.
- If you are using a B or C monitor instead the iPad app, check to make sure the Bluetooth modules are still linked. For B monitors, the LED labeled “D3” will blink occasionally if the modules are connected. For C monitors, the orange LED labeled “Comm” will be on continuously if the modules are connected. If the modules are not connected, see our separate video on linking the Bluetooth monitor.
If the issue is still unresolved, contact GFC at 217-285-6487 or gfc@balebandit.com.
Note: The machine has turned on the Strap Guide Arms motor and sent them up. When the Strap Guide Arms magnet reaches the Bale Position 0 sensor bar switch, the machine stops the motor. The machine is waiting for the magnet to reach the Bale Position 0 sensor bar switch. The switch is located upper mid way of the sensor bar at the brown mark.
– Check that Strap Guide Arms are in time with each other. They should be the same height. If their heights vary ½ inch (12.5 mm) or greater then they are at least one gear tooth out of time. A quick way to check their heights is to compare the distance between the Vertical Plunger plates to the Strap Guide plates. The right side should be the same distance as the left side. In order to prevent the Strap Guide arms from getting out of time, keep their chains tight.
– Check that hydraulic power is still on to the machine and that return line is still connected.
– Check that a bale, excess hay or foreign object is not preventing the Strap Guide Arms from rising.
– Check that the directional valve is not stuck.
If the iPad or monitor says there has been a communication delay:
- Disengage the hydraulic power and unplug the power cord. Wait approximately 10 seconds and then plug it back in and reengage the hydraulic power
- If that does not change the operation code, then turn the hydraulic power off and check the voltage going to the two electrical boards. Make sure they are receiving at least 12 volts.
- Check the R1 and T1 wire connections on the front and band electrical boards.
- If you are using a B or C monitor instead the iPad app, check to make sure the Bluetooth modules are still linked. For B monitors, the LED labeled “D3” will blink occasionally if the modules are connected. For C monitors, the orange LED labeled “Comm” will be on continuously if the modules are connected. If the modules are not connected, see our separate video on linking the Bluetooth monitor.
If the issue is still unresolved, contact GFC at 217-285-6487 or gfc@balebandit.com.
Note: This code occurs after the Reset Bundle button has been pressed. After the machine has extended the Horizontal Plunger cylinder, the Horizontal Plunger reed switch should be lined up with the Horizontal Plunger magnets, which turns the switch on. This is what the machine is waiting for.
If the Horizontal Plunger cylinder is fully extended,
– Check the air gap distance between the Horizontal Plunger reed switch and the magnet. The distance should be a maximum of 3/8 inch (9 mm). If it is within the suggested range then the reed switch needs to be replaced.
If the Horizontal Plunger cylinder is partially extended,
– Check that a bale or foreign object is not preventing the Horizontal Plunger cylinder from extending.
– Hydraulic power or hydraulic return has been disconnected or shut off from machine. This circuit has a 2-position valve and cannot be partially extended unless power or return has been disconnected or shut off.
If the Horizontal Plunger cylinder is still retracted,
– Check that hydraulic power is still on to the machine and that return line is still connected.
– Check that a bale or foreign object is not preventing the Horizontal Plunger cylinder from extending.
– Check that the directional valve is not stuck.

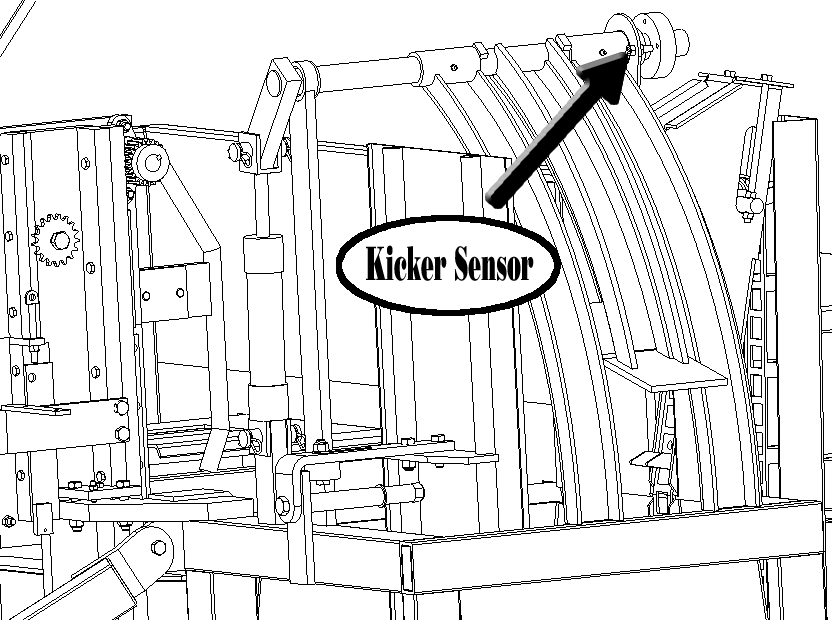
Note: This code occurs after the Reset Bundle button has been pressed. After the machine has retracted the Kicker cylinder, the Kicker reed switch should be lined up with the Kicker magnet located in the round plastic, which turns the switch on. This is what the machine is waiting for.
If the Kicker cylinder is fully retracted,
– Check the air gap distance between the Kicker reed switch and the magnet. The distance should be a maximum of 3/8 inch (9 mm). If it is within the suggested range then the reed switch needs to be replaced.
If the Kicker cylinder is partially retracted,
– Check that a bale or foreign object is not preventing the Kicker from retracting.
– Hydraulic power or hydraulic return has been disconnected or shut off from machine. This circuit has a 2-position valve and cannot be partially extended unless power or return has been disconnected or shut off.
If the Kicker cylinder is still extended,
– Check that hydraulic power is still on to the machine and that return line is still connected.
– Check that a bale or foreign object is not preventing the Kicker from retracting.
– Check that the directional valve is not stuck.